
In response to interests on the paper hellebores/Christmas roses that I put on the Christmas card posted HERE, this is a tutorial on how to make them yourself.

This tutorial is picture loaded. Sorry I don't have a camcorder, sigh...so no video for you. (And I've put this together very quickly, so I hope the step-by-steps make sense...tee hee.)
Materials and required:
- white cardstock (I used American Craft 80lb (216gr) cardstock)
- vanilla/cream coloured cardstock
- Ranger Distress Ink stamp pad Forest Moss and dabber
- water-filled spray bottle
- punches and dies as shown below
- 1/8" circle hand-punch
- embossing tools (large ball, small ball)
- scissor and glue
These are the punches and die that I used:
You do NOT have to use these ones exactly, just find punches/dies that will give you similar shapes and sizes.

For each flower you need the following number of punched pieces:
- 5 white petals
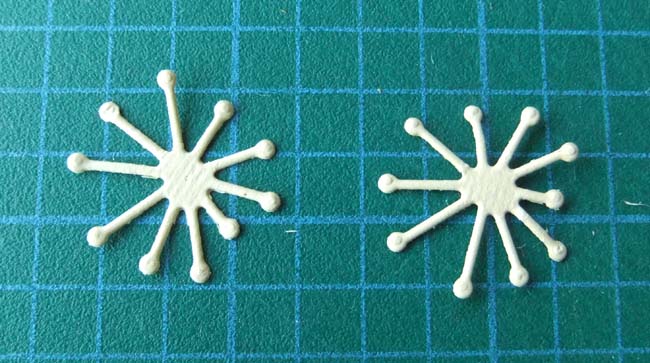
- 2 vanilla/cream stamens for the flower-centre outer layer
- 3 vanilla/cream cosmos for the flower-centre inner layers
- 1/2" green circle

Apply some Forest Moss ink on the lower parts of the white petals as shown. I used my dabber to apply the ink. (You can make your own, it's easy!)

Spray some water on the white petals. Not too wet--just damp enough for the green ink to start to spread.

Stack the petals together, one on top of another.

Squeeze the petals from the outside to the middle to create wrinkles. I wrapped mine around the handle of my dabber/dauber to make it easier. (You can do the petals one by one if it makes it easier for you.)

Spread out the petals--curl them slightly upward--and let dry.

Take your half-inch green circle and punch out a hole in the centre using your 1/8" hand punch

Once the petals are dry, clip off the small ends of the petals as shown.

Apply glue to the small green circle and adhere the petals in place as shown.

Glue the 2 punched stamen pieces together as shown, offsetting the fingers or whatever you call them.


For each of the cosmos, split each petal in three as shown.

Cup the cosmos pieces as shown...
- the first one, I used the larger-ball embossing tool
- the second, I used the smaller-ball embossing tool (to make a tighter cup)
- the third, I actually just fold the flower in half and then fold it again in half

Glue the pieces together as shown to form the flower centre.

Adhere the flower centre to the white petals in place as shown.

I happen to have this leaf die in my stash that I thought would be perfect--it's one of the leaves in a Cheery Lynn Tropical Leaves set B119. You can also probably find something similar in your own die collection.

Voila! There you go!

Hmm...the flower looks a bit ragged...LOL. But like I said, I did do this tutorial very quickly. Have fun!
Edited Sep. 21/13: I've done another set of flowers and I've added dots to the petals using a Promarker marker fitted with an ultra-fine tip.


33 comments:
Norma you are so sweet,
thanks for your tutorial
fabulous roses and your card is gorgeous
hugs Tamara
They look stunning Norma, thanks for the tutorial xx
Wow Norma. This is a brilliant tutorial. I will have to get some punches.
Tfs
Hugs
Penni
X
WOW!!!!! Your flowers are stunning Norma. Thank you for such a clear and fabulous tutorial
Sue xx
Oh Norma, I love your tutorial my dear, so easy to follow and fabulous results. Thank you for sharing.
Hugs
Suzi x
This is simply gorgeous. Thanks so much for your tutorial, lots of time and effort you have put into this.
Have a wonderful week.
Hugs,
Katie
Your hand made flowers are ALWAYS totally amazing and utterly gorgeous!!! Such an easy to follow tutorial - thanx so much for your generosity in sharing with us flower-making challenged crafters
Lotsaluv
xXx
Norma... my dear you are so generous and BRILLIANT!!!
thank you so much for sharing this, wish I can make one, but not sure .. But your flowers always gorgeous!
Love,
Yulis
Fantastic card and great tutorial Norma..Loz
I didn't ask but I was going to. Thanks for reading my mind! Beautiful.
What a gorgeous gorgeous looking flower. Love the way in which you explained it!! I always make my own flowers and recently experimented with foam roses. I am a big fan of your work!!
Cheers from India
Dr Sonia
Cards Crafts School Projects
Back to tell you I have pinned it here:Flower making Tutorials
Oh Norma this is absolutely gorgeous.
Hugs
Margaret M
Thank you! You make things so easy with your explanations and photos! Thank you!!!! :) Nancee
Thanks for the tutorial Norma! I always love your flowers, they look amazing and go so perfectly on your projects!
Your Christmas card is so beautiful Norma and the Hellebores is a real eye-catcher. So glad you share the tutorial with us, Thanks a lot!!!!. Haven't got all the punches, but I will find a way to make some.... I do have the tropical leave so that's a good start ;)
A fantastic tutorial!!! Thanks for sharing
hugs Vicky xx
Ta carte est superbe ! Et ton tuto pour les fleurs extra ! Merci
Bises
Oh it's soooo pretty Norma! I love your tutoiral too. thank you. hugs! MOjca
What a beutiful card and a super clear tutorial.
Thanks fot chairing.
Huggs Aya
I love your gorgeous flowers, thanks a lot for the tutorial!
Lovely flowers...That too very easily...loved it...Thanks for sharing..
Amazing Norma! First, your flowers are to die for and second, your tutorial is perfect to follow! Thank you so much for taking the time to show us.I actually love the pictures better then if you taped it! Awesome Awesome!
One million thanks for share this. Some days ago when I first saw the flowers I was reading WHERE can they bought. Stunin flowers really. Elena F.
Thanks so much for the tutorial Norma, your flowers are stunning! Oh dear more things to add to my wishlist
Hugs Julie P
Thank you so much for the tutorial Norma. they are gorgeous flowers.
Clever you.
Hugs Maz
Thank you for this wonderful tutorial.
Hi, Norma. I don't know how I missed this post. Your handmade flowers are always so fabulous. I love the techniques you show here and I will be trying some of these. You are such a wonderfully creative and talented artist.
Hugz,
Cathy Lee
What a beautiful card and a great tutorial on how to make the flowers. Thanks so much for sharing.
Really beautifyukl flowers. Thank you for the tutorial!
Eret x
Wow...Thanks for the tutorial on showing us how to make these Gorgeous flowers, now all I need is the memory box dies and punches!!
Beautiful card and love the tutorial will definitely be having a go thanks so much xxxx
Exquisite. Thank you for sharing.
Post a Comment